

The Azure AI search is one of the most powerful search engines at least in my experience. In times of AI and LLMs the in the past boring technology of search engine lives now a new hype. In this blog post, I’ll guide you through deploying and configuring Azure AI Search, how it can transform your data into a highly searchable, AI-enhanced resource.
What is the Azure AI search?
Azure AI Search is a Platform-as-a-Service (PaaS) offering from Microsoft Azure. It enables organizations to create search indexes from various data sources and formats, such as SQL databases, PDF documents, PowerPoint files, and more. One of its standout features is vector search, which uses AI to better understand, and match search queries based on meaning rather than just keywords. You can even leverage models like Azure OpenAI’s text-embedding-ada-002 or newer versions to enhance your search capabilities.
Deploying the Service
The deployment is very straightforward. Follow this steps:
- Open the Azure Portal: In the search bar, type “Azure AI Search” and select it from the results.
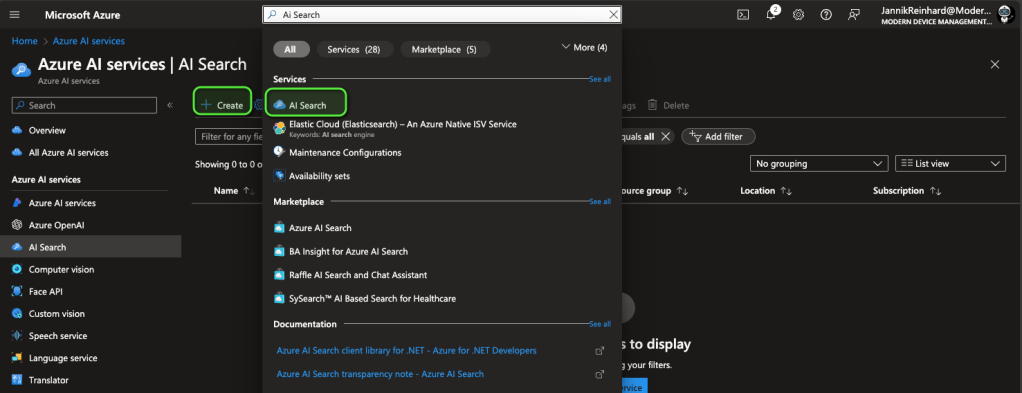
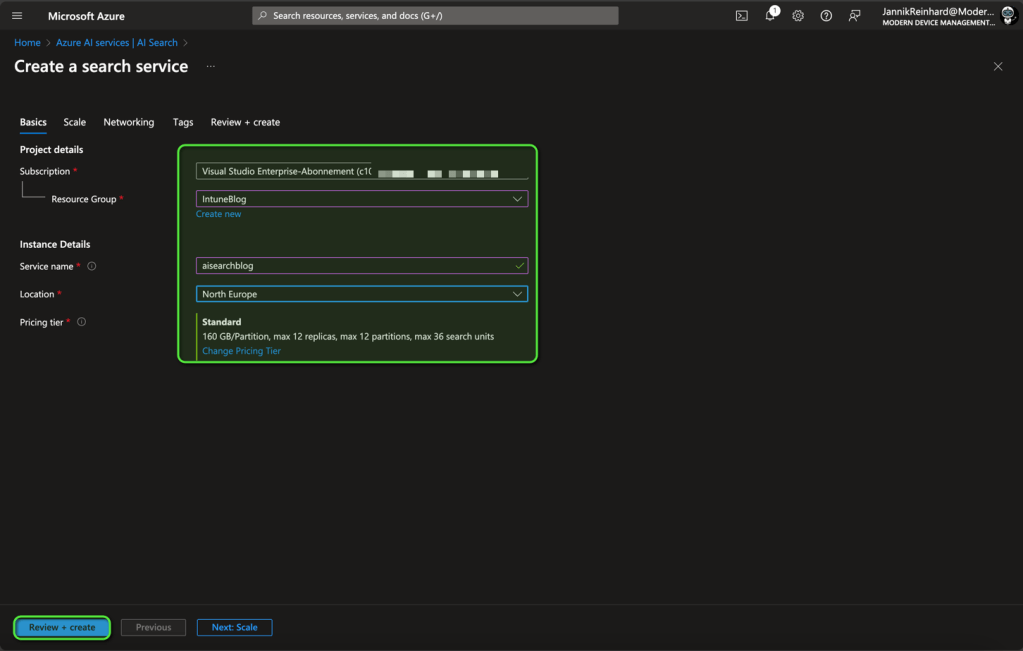
- Create the Service: Click on the “+ Create” button. Then, select your subscription, resource group, and region, and give your search resource a name.
- Security Considerations: For production environments, it’s best to secure the resource by placing it within the same network as your application. For this tutorial, we’ll skip this step, but it’s recommended for production deployments.
- Review and Deploy: After reviewing your settings, click “Review + Create” to deploy the resource.
This was the easy part.
Preparing Your Environment
Before creating your search index, there are a few preparatory steps:
1. Enable System-Assigned Managed Identity: This allows your search service to securely access other Azure resources. You can activate this in the Identity settings of your Azure AI Search instance.

2. Set Up Blob Storage: Create a Blob storage account and container to store the data you want to index. Follow the instructions here to set this up.
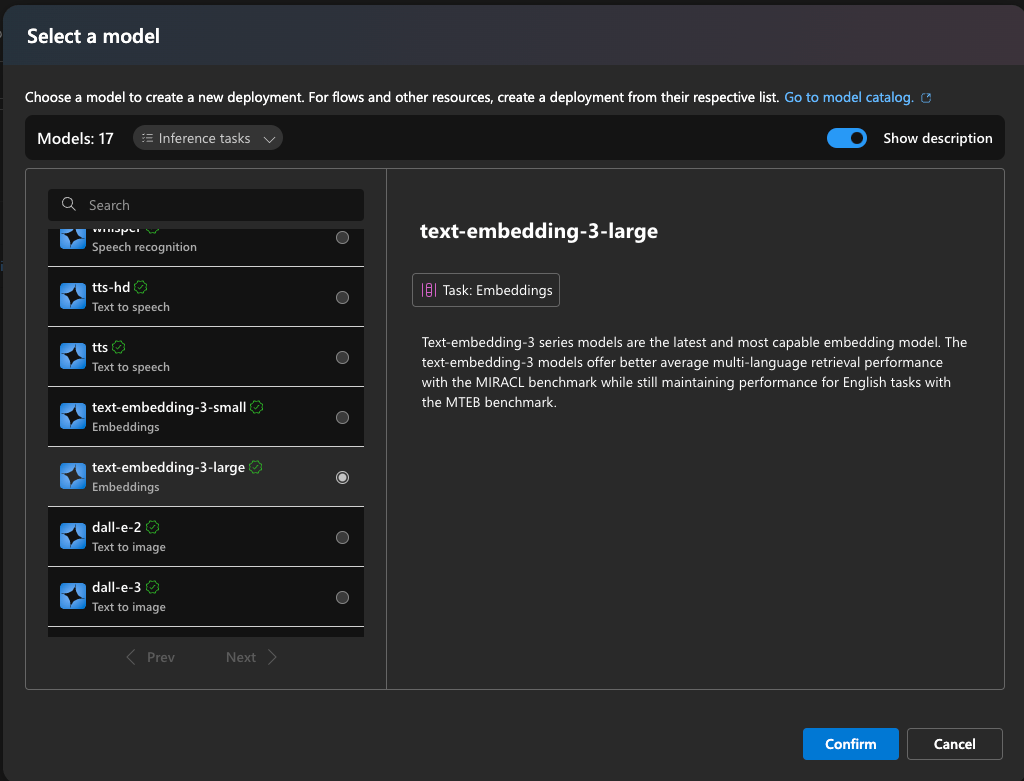
3. Deploy an Embedding Model: To use vector search, you’ll need to deploy an embedding model. Start by creating an Azure OpenAI instance. Once deployed, go to the “Deployments” section and select the text-embedding-ada-002 model or the latest available model.
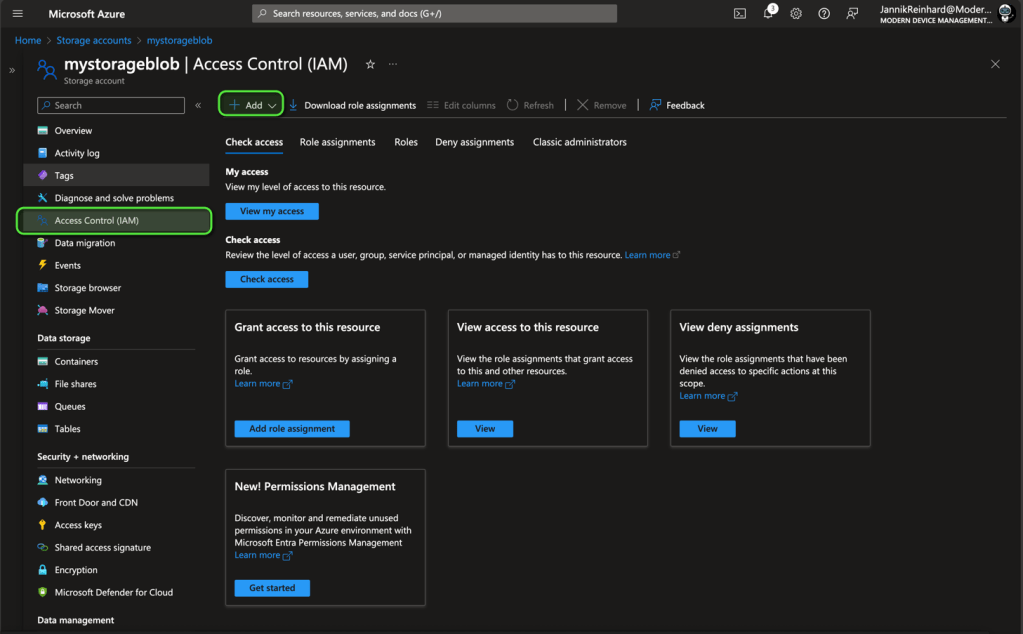
By enabling System-Assigned Managed Identity, you can give your search service permissions to read from your Blob storage. Open the Blob storage account, navigate to “Access Control,” and add the “Storage Blob Data Reader” role to your search service’s managed identity.

Creating an Index
Creating an index in Azure AI Search is a key step in making your data searchable. You can do this through the web interface:
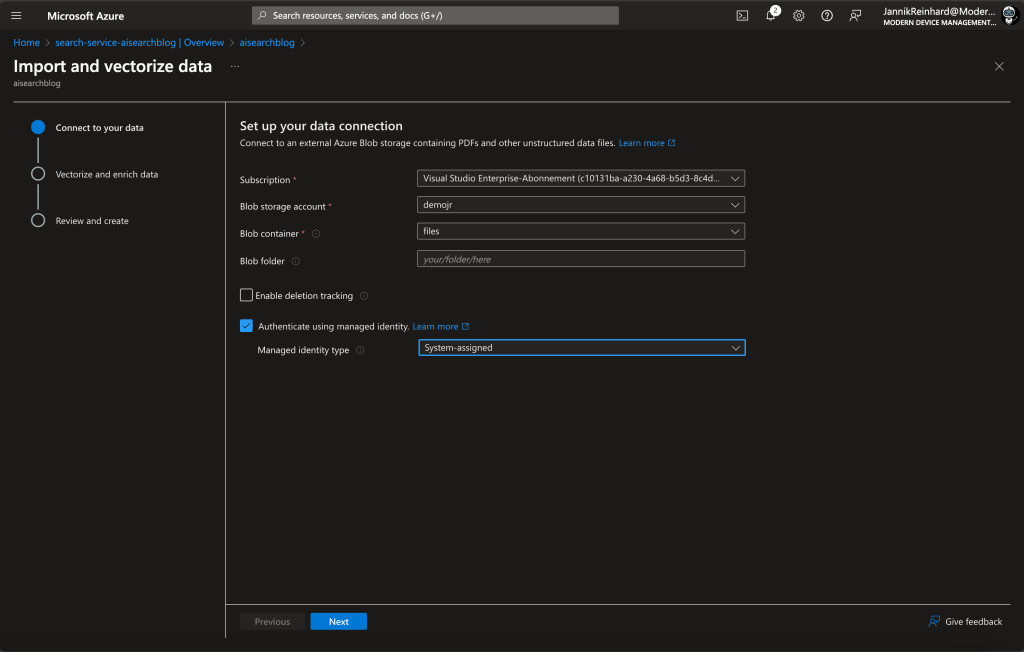
1. Use the Assistant: On the start page of your Azure AI Search service, you’ll find an assistant that can guide you through the process of creating an index. Click on “Import and Vectorize Data.”

2. Select Data Source: Choose your Blob storage account and container, where the files you want to index are stored.
3. Authenticate: For authentication, select “System-Assigned Identity”.
4. Add Embedding model: Select your embedding model created earlier.
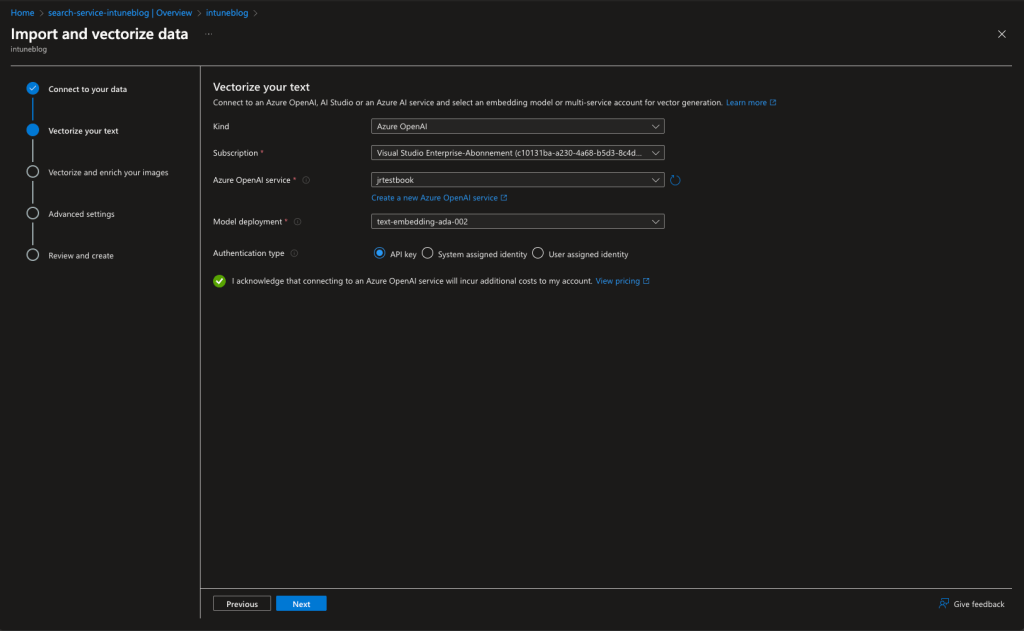
5. Create Schedule: The Enrich image step you can skip (If you don`t want to index images) and select a schedule for a refresh in the Advanced settings step.
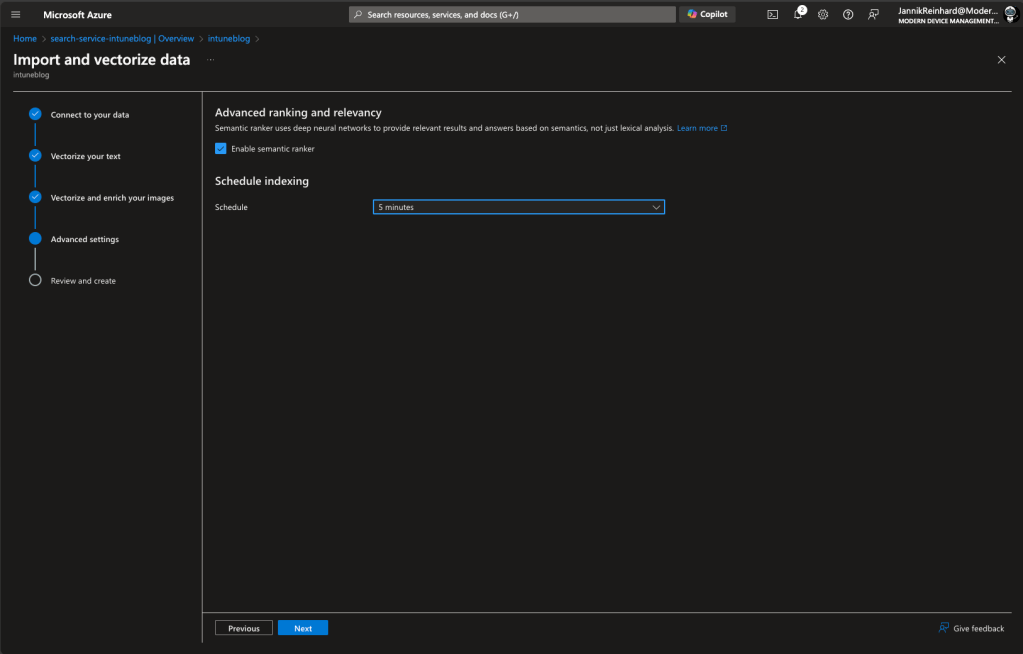
6. Review and Complete: Follow the assistant’s steps to finalize your index.
For more advanced environments with multiple stages, it’s often better to automate this process via code.
Automating with Code
What I showed you bevor works but is not the optimal solution if you are in a larger environment with multiple stages and where reproducibility is an important thing. Let’s have a look how you can do the same via code. First of all, we check which API calls you need. The first one is to create the Datasource. Let`s have a look on an example for an Azure File Share:
PUT
https://{SEARCHRESSOURCENAME}.windows.net/datasources/{DTASOURCENAME}?api-version=2024-05-01-Preview
{
"name": "DATSOURCENAME",
"description": "DESCRIPTIONOFTHEDATASOURCE",
"type": "azurefile",
"credentials": {
"connectionString": "CONNECTIONSTRINGORTHERAUTH"
},
"container": {
"name": "SHARENAME",
"query": "QUERY"
},
"dataDeletionDetectionPolicy" : {
"@odata.type" :"#Microsoft.Azure.Search.SoftDeleteColumnDeletionDetectionPolicy",
"softDeleteColumnName" : "IsDeleted",
"softDeleteMarkerValue" : "true"
}
}This is a short python script to do this via code:
import os
import requests

# Set up environment variables
azure_search_secret = os.getenv("AZURE_SEARCH_KEY")
azure_search_endpoint = "https://your-search-resource.search.windows.net"
file_share_connection_string = os.getenv("FILE_SHARE_CONNECTION_STRING")

# Define the data source
data_source_name = "ds-secret-intune-info"
datasource_url = f"{azure_search_endpoint}/datasources/{data_source_name}?api-version=2024-05-01-Preview"

body = {
    "name": data_source_name,
    "description": "It is very secret",
    "type": "azurefile",
    "credentials": {"connectionString": file_share_connection_string},
    "container": {"name": "intune", "query": "secret"},
    "dataDeletionDetectionPolicy": {
        "@odata.type": "#Microsoft.Azure.Search.SoftDeleteColumnDeletionDetectionPolicy",
        "softDeleteColumnName": "IsDeleted",
        "softDeleteMarkerValue": "true",
    },
}

# Send the request to create the data source
response = requests.put(
    datasource_url,
    json=body,
    timeout=1000,
    headers={"api-key": azure_search_secret, "Content-Type": "application/json"},
)

# Output the response
print(response.json())
This script demonstrates how to automate the creation of a data source. The same approach can be applied to create indexes, indexers, aliases, and skillsets. The URLs for each API endpoint are as follows (for sure the body is different):
- Index:
f"{azure_search_endpoint}/indexes/{index_name}?api-version=2024-05-01-Preview" - Indexer:
f"{azure_search_endpoint}/indexers/{indexer_name}?api-version=2024-05-01-Preview" - Skillset:
f"{azure_search_endpoint}/skillsets/{skillset_name}?api-version=2024-05-01-Preview" - Alias:
f"{azure_search_endpoint}/aliases/{alias_name}/reset?api-version=2024-05-01-Preview"
This method is ideal for environments with complex workflows where consistency is crucial across multiple stages.
Enabling Vector Search
Vector search is a game changer for applications that need to deliver relevant and contextual search results. Unlike traditional keyword-based searches, vector search understands the semantic meaning of queries by leveraging AI-powered embeddings. Here’s how it works:
- Embedding Models: Azure AI Search integrates with models like text-embedding-ada-002 to transform your data into vectors. These vectors represent the meaning behind words and phrases, making search results more accurate and contextually relevant.
- Practical Use Case: For example, if you’re indexing documents related to customer support, a vector search would allow users to find relevant content based on their question, even if the exact wording doesn’t match the documents.
By combining Azure AI Search with vector search, you can provide a much richer and more meaningful search experience in your applications. Whether you’re powering an internal knowledge base or a customer-facing search tool, this feature can significantly enhance the quality of your results.
To enable this, you need an skill set like this
{
  "name": "SKILLSETNAME",
  "description": "...": [
    {
      "@odata.type": "#Microsoft.Skills.Text.AzureOpenAIEmbeddingSkill",
      "name": "RANDOMNAME",
      "description": null,
      "context": "/document/pages/*",
      "resourceUri": "https://your-oai-resource.openai.azure.com",
      "deploymentId": "text-embedding-3-large",
      "apiKey": "APIKEY",
      "modelName": "experimental",
      "inputs": [
        {
          "name": "text",
          "source": "/document/pages/*"
        }
      ],
      "outputs": [
        {
          "name": "embedding",
          "targetName": "vector"
        }
      ],
      "authIdentity": null
    },
    {
      "@odata.type": "#Microsoft.Skills.Text.SplitSkill",
      "name": "RANDOMNAME",
      "description": "Split skill to chunk documents",
      "context": "/document",
      "defaultLanguageCode": "en",
      "textSplitMode": "pages",
      "maximumPageLength": 2000,
      "pageOverlapLength": 500,
      "maximumPagesToTake": 0,
      "inputs": [
        {
          "name": "text",
          "source": "/document/Description"
        }
      ],
      "outputs": [
        {
          "name": "textItems",
          "targetName": "pages"
        }
      ]
    }
  ],
  "cognitiveServices": null,
  "knowledgeStore": null,
  "indexProjections": {
    "selectors": [
      {
        "targetIndexName": "NAMEOFTHEINDEX",
        "parentKeyFieldName": "parent_id",
        "sourceContext": "/document/pages/*",
        "mappings": [
          {
            "name": "chunk",
            "source": "/document/pages/*",
            "inputs": []
          },
          {
            "name": "vector",
            "source": "/document/pages/*/vector",
            "inputs": []
          },

          ...ALL_OTHER_ATTRIBUTES...
        ]
      }
    ],
    "parameters": {
      "projectionMode": "skipIndexingParentDocuments"
    }
  },
  "encryptionKey": null
}
In the index you need then the following config
{
  "name": "INDEXNAME",
  "defaultScoringProfile": "SCORINGNAME",
  "fields": [
    ...ALL_OTHER_ATTRIBUTES...
    {
      "name": "parent_id",
      "type": "Edm.String",
      "searchable": false,
      "filterable": true,
      "retrievable": true,
      "sortable": false,
      "facetable": true,
      "key": false,
      "indexAnalyzer": null,
      "searchAnalyzer": null,
      "analyzer": null,
      "normalizer": null,
      "dimensions": null,
      "vectorSearchProfile": null,
      "synonymMaps": []
    },
    {
      "name": "chunk",
      "type": "Edm.String",
      "searchable": true,
      "filterable": false,
      "retrievable": true,
      "sortable": true,
      "facetable": false,
      "key": false,
      "indexAnalyzer": null,
      "searchAnalyzer": null,
      "analyzer": null,
      "normalizer": null,
      "dimensions": null,
      "vectorSearchProfile": null,
      "synonymMaps": []
    },
    {
      "name": "vector",
      "type": "Collection(Edm.Single)",
      "searchable": true,
      "filterable": false,
      "retrievable": true,
      "sortable": false,
      "facetable": false,
      "key": false,
      "indexAnalyzer": null,
      "searchAnalyzer": null,
      "analyzer": null,
      "normalizer": null,
      "dimensions": 3072,
      "vectorSearchProfile": "vector-profile",  #Should be the same
      "synonymMaps": []
    }
  ],
  "scoringProfiles": [
    YOUR_SCORING_CONFIG
  ],
  "corsOptions": null,
  "suggesters": [],
  "analyzers": [],
  "normalizers": [],
  "tokenizers": [],
  "tokenFilters": [],
  "charFilters": [],
  "encryptionKey": null,
  "similarity": {
    "@odata.type": "#Microsoft.Azure.Search.BM25Similarity",
    "k1": null,
    "b": null
  },
  "semantic": {
    "defaultConfiguration": null,
    "configurations": [
      YOUR_SEMANTIC_SEARCH_CONFIG
    ]
  },
  "vectorSearch": {
    "algorithms": [
      {
        "name": "RANDOMNAME",
        "kind": "hnsw",
        "hnswParameters": {
          "metric": "cosine",
          "m": 4,
          "efConstruction": 400,
          "efSearch": 500
        },
        "exhaustiveKnnParameters": null
      }
    ],
    "profiles": [
      {
        "name": "vector-profile", #Should be the same
        "algorithm": "RANDOMNAME",
        "vectorizer": "RANDOMNAME"
      }
    ],
    "vectorizers": [
      {
        "name": "RANDOMNAME",
        "kind": "azureOpenAI",
        "azureOpenAIParameters": {
          "resourceUri": "https://your-oai-resource.openai.azure.com",
          "deploymentId": "text-embedding-3-large",
          "apiKey": "APIKEY",
          "modelName": "experimental"
        },
        "customWebApiParameters": null
      }
    ]
  }
}
Conclusion
Azure AI Search is a versatile tool that brings advanced search capabilities to your fingertips. With features like vector search and seamless integration with Azure services, it enables you to create powerful, AI-enhanced search experiences tailored to your data. Whether you’re dealing with structured or unstructured data, Azure AI Search can help you unlock new insights and improve search relevance.
While the initial setup might seem complex, the step-by-step process simplifies deployment, and with the option to automate tasks via code, scaling your search solution becomes more manageable. Embrace the power of Azure AI Search to take your search capabilities to the next level and stay ahead in the evolving AI landscape.
Happy searching!
Jannik
